

High-quality music streaming is the most requested feature on Spotify the whole time. Since September 2025, Spotify has offered Spotify Hifi / Spotify Lossless for Premium users. This CD-quality streaming enjoys great popularity.
Typically, users still get to stream Spotify songs at the best possible quality through its internal settings. In default, Spotify provides 5 audio qualities available on most devices: 24 kbps (Low), 96 kbps (Normal), 160 kbps (High), 320 kbps (Very High), Lossless (FLAC 24-bit) . Also, a variable "Automatic" setting allows to stream music at a lower bit bitrate when the internet is unstable.
If you're the one who also says no to poor audio quality, just follow this article to change the audio setting on Spotify and listen to Spotify streams with high-quality output.
Read also: How to Download Spotify Lossless - Complete Guide 2026
Before going to make changes on Spotify audio quality settings, a matter should note is that only Spotify Premium has the option to access 320 kbps very high streaming quality, while Spotify Free listeners will get 160kbps bitrate. Just make sure you've upgraded to a paid account to stream exclusive high-resolution audio on Spotify.
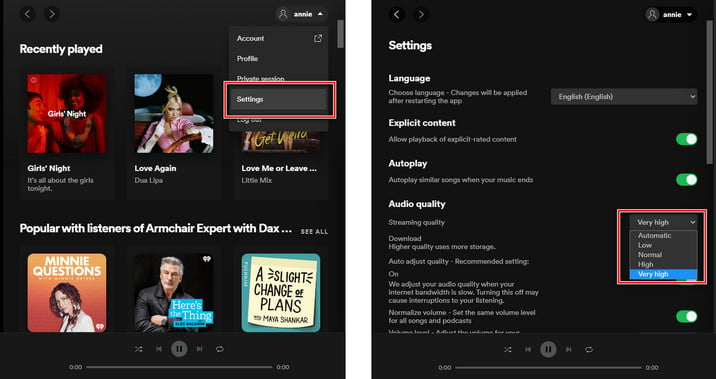
Here're the detailed steps to improve the sound quality on Spotify app of Windows or Mac system:
Step 1 Open the Spotify desktop app on computer and log into your music account.
Step 2 Click the "down arrow" beside your profile icon, and select "Settings" in the list.
Step 3 On the section of Audio Quality > Streaming Quality, choose the "Very High" option in the dropdown list. This means your streaming audio quality will be set to 320 kbps bitrate on Spotify.
Tips: If you are a Spotify Free user, the "Very High" setting will be not working -- nonoptional.
Spotify gives you various audio quality options. Let's check out what those options are and how you can improve your Spotify listening sound quality. Learn More →
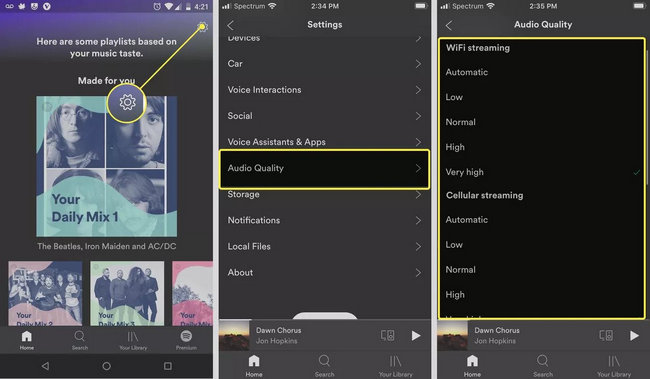
There's practically no difference on the steps of changing Spotify streaming quality on a mobile phone or desktop:
Step 1 Go to "Library" at the bottom right, click the button "Setting" gear icon.
Step 2 Scroll down and click the "Audio Quality" to go to the quality section.
Step 3 In the new window, you'll find a list of available quality settings for both Wi-Fi and cellular streaming. Please note that choosing a high streaming quality on the cellular setting will cost you a lot of data usage.
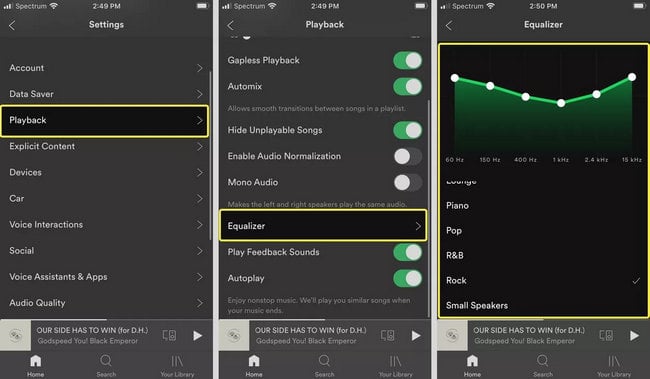
Another way to improve audio quality on Spotify is to make some changes on its built-in equalizer tool. You can customize a preferred frequency configuration to enjoy songs with a better sound.
Step 1 Again go to the "Library > Settings" option on Spotify.
Step 2 Scroll down and choose "Playback", then "Equalizer".
Step 3 Choose one of the music genres below, and just adjust the graphic equalizer dots to make a custom setting.
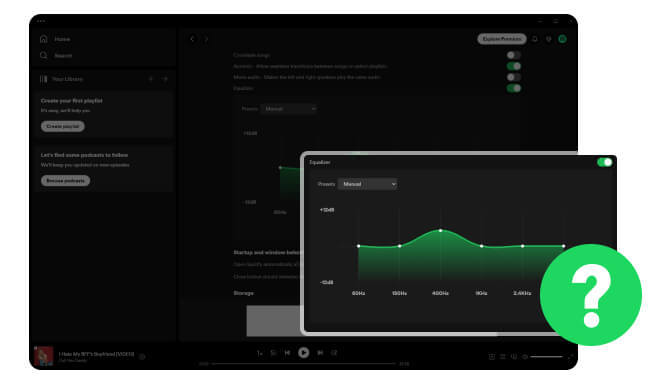
Here you will find the detailed-explain steps to find Spotify Equalizer and the best equalizer settings. Learn More →
As a Premium member on Spotify, you could directly download Spotify songs in high quality with the app. But one of the inconveniences is that the downloaded content is inextractable and untransferrable, for example, not allowed to import into DJ software. So to download Spotify high streaming and enjoy without limitations, it's suggested to download them to MP3 format.
NoteBurner Spotify Music Converter ( For Windows | For Mac ) is your key to extract MP3s from any Spotify songs, playlists, podcasts, or radios with 100% original quality kept. In the settings window of NoteBurner, you are able to select different quality bitrates (from 128kbps to 320kbps). With an intuitive interface, it's pretty easy to use NoteBurner to download Spotify at 320 kbps high quality.

To download Spotify 320 kbps music offline, it's required a Premium account. Before getting started, please download NoteBurner Spotify Music Converter on your computer first.
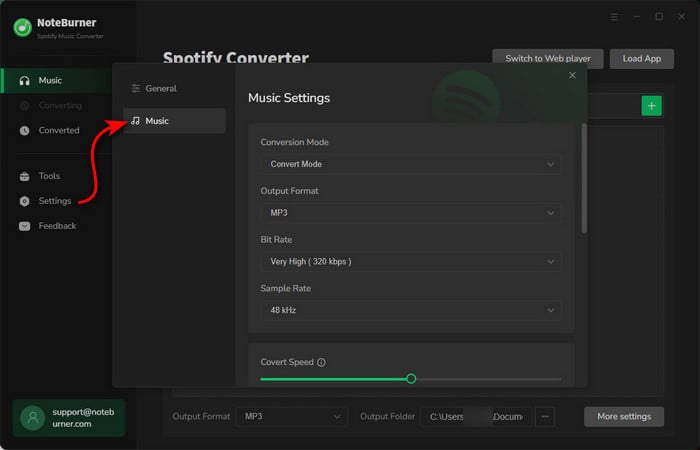
Step 1 Choose Output Quality & Format
Open NoteBurner Spotify Music Converter and click record from Spotify app. Tap the icon "Settings", here you are able to choose Output Format (MP3, AAC, FLAC, AIFF, WAV, or ALAC), Output Quality (128kbps, 192kbps, 256kbps, 320kbps), sample rate (44.1kHz, 48kHz, 96kHz), output path, and more.
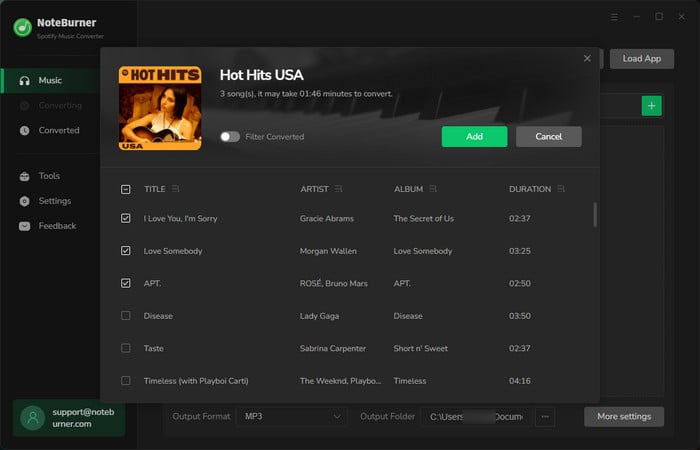
Step 2 Import Spotify High-Quality Streaming to NoteBurner
Simply drag and drop a playlist from Spotify to NoteBurner. Or you can also directly copy & paste the Spotify music URL to NoteBurner for analysis. Tick on the Spotify songs and click "Add".
Step 3 Download Spotify Music
Tap "Convert" to download the Spotify playlist to computer as MP3 files with 320 kbps high-quality output.
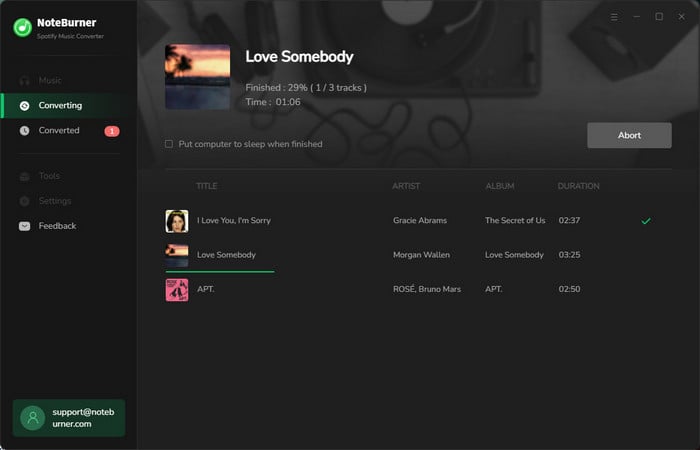
After conversion successfully, by clicking the "History" tab (like a clock) or directly going to the output folder you customized in Step 1, you can find all the converted Spotify songs.

The post collects the top 9 free Spotify to MP3 downloaders that are still working in 2026, making it easy to get Spotify MP3 songs in 320 kbps for offline listening.
Now, you've got 4 ways to get high-quality music from Spotify. But if you are planning to import Spotify songs to some unsupported devices or media player, it's better to follow the method in Part 4. NoteBurner Spotify Music Converter will help you download any Spotify songs offline with 1:1 quality output, so that you could enjoy your own playlists anywhere anytime.
Note: The free trial version of NoteBurner Spotify Music Converter allows you to convert the first 1 minute of each song. You can buy the full version to unlock this limitation and enable all its features.