
iCloud Music Library is an amazing feature for Apple users, as it allows them to store up to 100,000 music files to iCloud and access the music library across all of their Apple devices signed into the same iCloud account. Anyone who has an Apple Music or iTunes Match subscription can take advantage of it. However, this feature doesn't completely error free. Some annoying bugs, including missing music, missing artwork, and duplicate playlists, may crash people enthusiasm to use it anymore. In this case, you may need to turn off iCloud Music Library on your devices. Well, what we are sharing here is the detailed guide to help you turn off iCloud Music Library when you don't need it. Also, you can follow this guide to find the option iCloud Music Library to enable it as needed.
Note: iCloud Music Library is not a backup service, so make sure to always have a backup of your music collection before you make any changes.

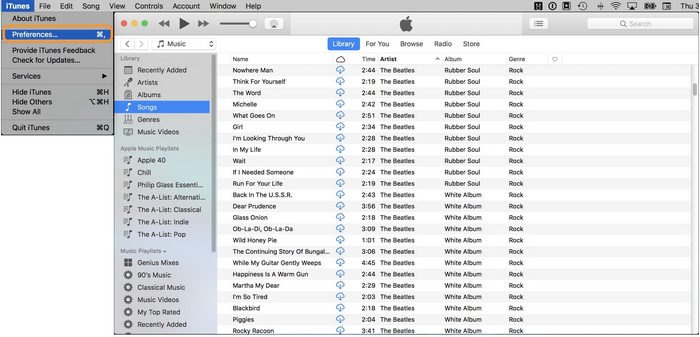
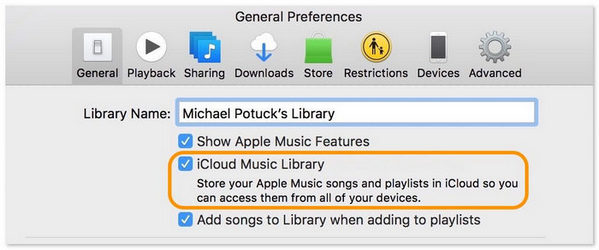
Please follow these steps if you want to disable iCloud Music Library on your PC or Mac.
Step 1: Open iTunes.
Step 2: Go to the iTunes > Preferences menu.

Step 3: Under the General tab, uncheck the iCloud Music Library option.

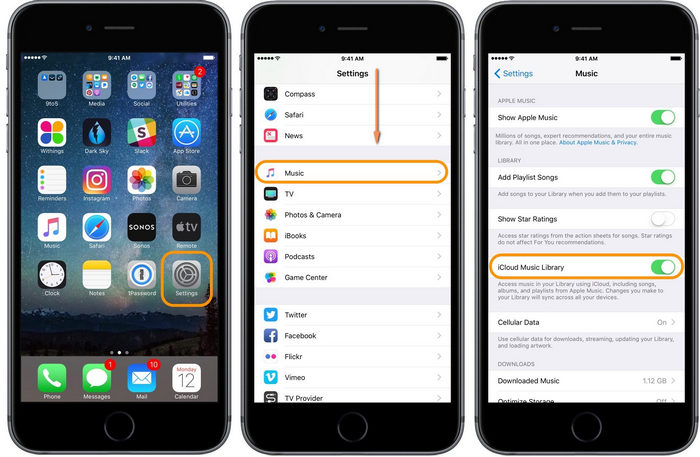
Please follow these steps if you want to disable iCloud Music Library on your iPhone.
Step 1: In the Settings app, tap Music.
Step 2: Scroll down to the iCloud Music Library setting.
Step 3: Toggle the "iCloud Music Library" switch to the OFF position.

Keep in mind that all of your downloaded music from Apple Music, you can access directly on your devices offline, will be deleted, once the iCloud Music Library is disabled. If you don't like using iCloud Music Library but still want to keep Apple Music songs offline on your devices for streaming, NoteBurner iTunes Audio Converter will be a great option to help you solve the trouble. It's an all-in-one smart Apple Music downloader and converter specially designed for Apple users to completely record Apple Music, and convert them to plain formats, like MP3, AAC, WAV, AIFF, FLAC, or ALAC format. With the help of this smart tool, you can easily get DRM-free Apple Music songs and enjoy them on any of your devices without turning on iCould Music Library.

Step 1 Download NoteBurner iTunes Audio Converter, then select "iTunes App" download mode.
Step 2 Add Apple Music Songs
Click the button "+" to add music, it will pop up a window, which will show you all of the songs you have downloaded from iTunes. You can choose any song you want to convert.
Step 3 Choose Output Format
After the successful adding, please click the button "Settings" to choose the output format as you need, in the pop-up window, you can set output path, output quality, and output format including MP3, AAC, FLAC, AIFF, WAV, and ALAC.
Step 4 Convert Apple Music to MP3
After completing the above steps, the final one is clicking the button "Convert". Just a few second, it will succeed. Once the conversion finishes, the DRM will be removed completely from Apple Music, you can freely import them to your devices for offline playback.